
Low sodium English muffins
- Mar 14, 2022
- 6 min read
I grew up eating packaged, store-bought English muffins, and I loved them. I was in my late twenties when I had my first home made English muffin! In the many years since that delicious discovery, I assumed that you needed special equipment or ingredients to make them and never thought to try until my cousin recently sent me a picture of some English muffins he made. Many dozens of muffin experiments later, I’ve settled on an easy, low sodium recipe. It’s a no-knead, overnight dough that looks a lot like my pizza dough recipe with milk and butter instead of just water and oil. It’s chewy and crispy with nooks and crannies and best of all, just 6 mg of sodium per muffin (compared to 240 mg sodium in a regular Thomas’ English muffin!) leaving you plenty of room to load them up with whatever sweet or savory toppings you like.

Servings: Makes 16 muffins Sodium: 6 mg sodium each
Time: 1 hour, plus time for the dough to rise overnight and proof
Ingredients for the English muffins:
500 grams bread flour or all purpose flour (about 4 cups)
1/2 teaspoon instant yeast
1/2 teaspoon onion powder (optional*)
1/4 teaspoon garlic powder (optional*)
2 tablespoons unsalted butter, melted and cooled to room temperature
2 tablespoons honey
182 grams water, room temperature (about 3/4 cup)
182 grams whole milk (about 3/4 cup), 2% is also fine but will have a little more sodium
*The onion and garlic powder add a subtle savory flavor. I always add them but if you know you're using these with sweet toppings only (butter, jam, etc.) you may prefer to leave them out.
Additional ingredients:
Fine cornmeal for dusting (about 1/2 cup should be plenty)
1) Mix the dough and give it a long rest: In a large bowl, combine all the dry ingredients and stir to blend, then add the wet ingredients and mix thoroughly. Note that the cornmeal is just for dusting the dough later, don't add it to the mixture. The dough is pretty soft so it should not be too hard to mix by hand. Cover with plastic wrap or a kitchen towel. Let the dough rest for 12-18 hours at room temperature until it has doubled. Don't worry if your house is cold at night, this slow rise works well in cooler temperatures and even helps to improve the flavor.
About the timing: After about 10-12 hours, you can throw the dough into the refrigerator for up to 24 hours until you're ready to use it. This is where this slow rise can give you a lot of flexibility. I usually mix my dough at night and bake the following afternoon because this fits in with my kids' bedtime/nap schedules. If you need the dough to be ready in the evening, mix it at night, put it in the refrigerator in the morning, and then take it out and let it sit about half an hour on the counter before you proceed with the recipe. Here's the dough just after mixing, and then after 14 hours (center and right). The pictures are dark because I made these at 5 am so my family could have fresh English muffins for breakfast. I think that makes me a saint. Actually, I just like to cook early in the morning when it's quiet.


2) Shape and rest: Sprinkle a light layer of cornmeal on two large parchment-lined roasting pans and set aside. The English muffins will rest on this parchment paper for 40 minutes and the cornmeal will keep it from sticking when you go to remove it for cooking.
Turn the dough out onto a well-floured work surface. I usually make 16 muffins from this recipe and they're about the size of the standard English muffins you buy from the grocery store, about 3.5-4 inches wide. The easiest way to divide this big ball of dough into sixteen is to divide it in half over and over. First into two half, then each half in half, then half again, you get it. Some will end up bigger than others but I'm okay with that.
Sometimes I make my muffins three different sizes. I divide the dough in half first. Then I take one half and divide that into 8 pieces. The other half I divide into 6 pieces, and then further divide three of those six pieces in half. So I get 6 large muffins, 8 medium muffins, and 4 small muffins. Confused? If so just ignore this paragraph but know that the little muffins are great for little kid hands and appetites and the big ones are perfect for English muffin pizzas.

Shape each piece into a ball and flatten each ball into about a 1/2 inch thick round. I find it's easier to roll all the pieces into balls, and then go back and flatten them. Just a little extra resting time makes it easier to flatten the dough without it pulling back. Place each flattened muffin on the parchment paper, sprinkle the top of each with a little cornmeal and cover with a dry kitchen towel. Let rest at room temperature for about 40 minutes. They won't rise very much at the point, they'll puff up when you cook them.
This dough is a bit wet and soft. The key to shaping it is to keep your work surface and hands lightly floured throughout the shopping and to handle the dough very lightly. When you're shaping the dough into a ball, pull the edges towards the top without pressing into the center too much. Flatten the dough gently. I keep a pile of flour in the corner of my mat for dusting my fingers as I go.
Sorry the lighting on these first few pictures is awful. Remember, it was 5 am and my kitchen lights are harsh.


Some recipes have you roll out the dough and use a biscuit or cookie cutter to cut out the English muffins. I tried that and found it to be more work and not worth the effort. My muffins also ended up more lopsided when I used my biscuit cutter but that's probably my fault for not rolling the dough evenly. The problem with this cutting method is you end up with scraps that you can certainly re-roll but then you have to knead the dough together, let it rest, and ultimately you'll have some waste at the end, or you'll end up with a rolled piece so why not just start there.
3) Cook the muffins - you can make these on the stove or on an electric griddle. I prefer the griddle because the temperature stays more consistent and it's got a large surface area. I set my griddle to 300°F and place 8 muffins on at once. If there's a lot of cornmeal stuck to the dough, gently brush off what you can. Don't add any oil or grease to the griddle, just throw the muffins on dry. Cook for 8-10 minutes, and then flip and cook another 8-10 minutes on the second side. If the muffins brown too quickly, turn the heat down a bit. The muffins should be 200°F in the middle when they're fully cooked. Set aside on a wire rack to cool before eating.


Look how they puff up as you cook them.
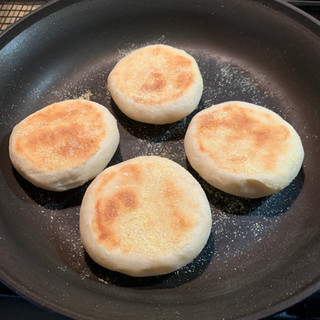
You can also cook these on a nonstick pan on the stove. Set the heat to medium-low and cook for 7-9 minutes per side with the lid on (if you have a lid, if not it's fine). Keep an eye on the heat, if the muffins are browning too quickly lower it. But if the pan is not hot enough, the muffins won't puff up as well. So something between medium and low, but closer to medium worked best for me. How unhelpful is that?


The first recipe I tried for English muffins was by Bigger Bolder Baking, and she suggested that cooking on the stove with a lid helped the muffins cook better because it trapped the heat. I actually found that the muffins cook just as well on a griddle without a cover. Here's a picture of my experiment, the muffin on the left was cooked on the stove, the right on the griddle. It's an imperfect comparison, but the practical lesson is that the English muffins will puff up just fine without a lid.

Allow the English muffins to cool on a wire rack, fork split, toast (I like to toast them even when they're fresh) and enjoy! To store, let the muffins cool completely and store in the refrigerator then toast before eating.
NOTES/TIPS:
-We go through these muffins in about 2-3 days but if you don't need that much bread in your life, you can easily make half the recipe (cut everything in half, including the yeast) or freeze half after they have cooled completely.
-I've made these with just water and no milk at all and they turned out just fine. They have zero sodium if you do it that way, but they're not as rich and the dough will be more stringy when you're shaping it. If you do go with all water, add an extra tablespoon of butter.


Any changes in the recipe if I substitute about a third of the flour with WW flour?