
Low sodium dumplings (shrimp or pork)
- Jun 12, 2021
- 8 min read
Updated: Feb 22, 2022
Dumplings can take a bit of time and effort so make these when you have plenty of time, or when you have some help. The wrappers are the most time-consuming, so if you can tolerate the sodium in store-bought wrappers, I say go for it! I've also made these wrappers using my Phillips pasta maker with the ravioli/lasagna attachment. If you have one, see my notes below for tips on how to make wrappers using the Philips pasta maker. All that said, they are worth it and if you're not in a hurry, rolling out the dough and wrapping the dumplings can be sort of relaxing. These are great for a group because you can make all the dumplings low sodium and just have different types of dipping sauces to satisfy everybody. I have two options below for the filling: pork or shrimp. The pork have about 6 mg of sodium each, and the shrimp have about 11, depending on the size of your dumplings.
Servings: Makes about 24 dumplings Sodium: 6 mg each (pork), 11 mg each (shrimp)
Time: 3 hours
Wrapper ingredients:
250 g (about 2 cups) all purpose flour
130 g (about 1/2 cup + 1 tsp) hot water
(Recipe from Red House Spice)
Filling ingredients for pork:
1/2 pound ground pork (80% fat works best)
1 teaspoon onion powder
4 cloves garlic, pressed or minced
1 tablespoon fresh ginger, grated, or 1/2 tsp ground ginger
1/4 teaspoon ground black pepper
4 medium sized leaves of napa cabbage, blanched and minced (about 1/2 cup)
1 tablespoon sesame oil
1 tablespoon molasses (optional)
1 tablespoon balsamic vinegar
2 teaspoons cornstarch
2 tablespoons water
Filling ingredients for shrimp:
1/2 pound unsalted shrimp, chopped small
1/4 cup soaked bean thread noodles, chopped small
1 scallion, chopped
4 dry shiitake mushrooms, rehydrated and chopped small
4 cloves garlic, minced
1-2 shallots, minced
1 teaspoon minced ginger
1 teaspoon onion powder
1/8 teaspoon fresh ground black pepper
1 tablespoon sesame oil
1 tablespoon water
For the dipping sauce:
I use my low sodium soy sauce substitute and add a little red wine vinegar, sesame oil, balsamic vinegar, and some chili garlic sauce to taste.
NOTES ON INGREDIENTS:
-You can use lots of other vegetables for the filling. Most leafy greens would work, just make sure to blanch and squeeze out excess water. Chives are very popular, too, and don't need to be blanched. I like the combination of shiitake mushrooms, noodles and shrimp but you could easily use the mushrooms and noodles in your pork dumplings, too.


-Shrimp can be very salty so check your labels carefully. Even fresh shrimp is very likely previously frozen, so if you're very sensitive to salt, go with something that has a label. The lowest sodium shrimp I've found is this Gulf Wild Shite Shrimp from Whole Foods at 135 mg of sodium for 4 ounces (which is about 5 shrimp).


-Most store bought wrappers will have 10-30 mg of sodium per wrapper. That's too high for us, but if you can manage it then you can save a lot of time by using store bought wrappers. I've found one brand that has zero sodium. It's a little drier and thinner than homemade but you can't beat the convenience. If using these, moisten the edges of the wrapper with a little bit of water before you wrap them so they hold up better.


For homemade wrappers:
1) Mix the dough (see Notes below if using the Philips Pasta Maker) - add the flour and hot water to a large bowl and stir to combine. I use water that's 200°F, just shy of boiling. Start by stirring with chopsticks and then use your hands to form the dough into a ball. Let it sit, covered, for 10-15 minutes. This short rest should make kneading easier. Then knead the dough until it is soft and smooth, about 5-6 minutes. The dough is pretty dry so you shouldn't need much flour on your work surface to knead it, but a sprinkle here and there will help. Return the kneaded dough to the bowl and let it rest for 45-60 minutes. While the dough is resting, make the dipping sauce and filling.


2) Prepare the filling - Blanch the napa cabbage by cooking it in boiling water for just 30 seconds to a minute. Remove the blanched cabbage and run it under a little cold water so you can handle it easily. Squeeze as much water as you can out of the napa cabbage, and mince it very small. You want about 1/2 cup of the blanched, minced napa cabbage. Add the napa cabbage and all remaining filling ingredients to a large bowl and mix to combine.
It may seem like a lot of liquid in the filling but this keeps the filling moist. Mix the meat in with everything else really well so that it becomes paste-like. I grab my disposable food prep gloves and use my hands to mix this. Cover and refrigerate the filling until you're ready to assemble the dumplings.


3) Prepare the wrappers - this is where it's really nice to have some help in the dumpling making process. If you have one person rolling the wrappers while another person wraps them, you cut your cooking time down significantly! To roll out the wrappers, take the dough and gently flatten into a disc, and then poke a hole in the middle to create a ring. On a lightly floured surface, cut the dough ring into 4 pieces, and then gently shape each piece into a log. Cut each log into 6 equal pieces.


4) Roll the wrappers - on a lightly floured surface, gently press down on each piece of dough with your palm to flatten it. Then take a small rolling pin and roll each piece flat by rolling from the outside of the dough towards the middle, then rotating the dough so that you're doing this on all sides. Each wrapper is about 4 inches in diameter. The video below will help illustrate this process. The reason you want to roll the wrappers out this way is that the center of each wrapper should be just slightly thicker than the edges. That creates a sturdier center for the filling and it also makes the dumplings easier to wrap, and the dough won't be too thick around the edges once they're folded. If I'm making these solo, I roll out about 10 wrappers at a time, and then place them in a container covered with a towel. Dust each wrapper with a little flour so they don't stick to each other, and place them so they're not directly one top of one another so they're easier to take apart once you start wrapping.
You could also roll the dough out thin and then use a biscuit cutter to cut out circles. I prefer rolling each out individually but it is a bit more time consuming. Do whatever is easier!


5) Fill the wrappers - fill them one at a time or lay out a few wrappers at a time and place about 1/3 - 1/2 tablespoon of filling in each. The video below shows one of the easier ways to fold dumplings. However you fold your dumplings, make sure you pinch the edges together tight so they don't open up when you cook them. For other methods of folding (and much better videos), Red House Spice has an amazing dumpling guide which includes a tutorial on 10 ways to fold dumplings. When I'm making more than one type of dumpling (some shrimp, some pork), I'll use a different fold for each type so they're easy to tell apart.


6) Place each dumpling on a lightly oiled or parchment lined baking sheet as you finish wrapping it. Next, you can either pan fry or boil the dumplings. Steaming is also an option but I don't have a big enough steamer so we don't steam our dumplings much at home. This is also when you can freeze them! Place your tray in the freezer for about 15-20 minutes until the dumplings start to get firm. Freezing them spaced out on the tray like this will keep them from sticking together as they freeze. Then place in a ziplock bag and freeze until ready to use. When you're ready eat them, cook them straight from the freezer as you would fresh dumplings, there's no need to defrost.

7) To pan fry the dumplings - pour a thin layer of cooking oil (canola, vegetable, or peanut work well) in a large nonstick skillet (this one is 12 inches). Heat the oil on medium-high and place the dumplings, flat side down, in the oil to cook until just light brown on the bottom. Don't overcrowd the pan. When the bottoms are light brown, turn the heat to high and pour just enough room temperature water into the pan to cover the bottom 1/4 of the dumplings. In my 12 inch skillet that's about 1/2 a cup of water. You're going to steam them now so they cook all the way through. Cover the pan and let the dumplings cook until the water evaporates. Be careful here because you're pouring water into a hot, oily pan! Have your cover ready, pour the water in quickly and put the cover on. Once the water evaporates, remove the lid and continue to cook over medium heat for 1-2 minutes until the bottoms are a darker brown.


8) To boil the dumplings - Heat a large pot of water on high. Once the water starts boiling, place dumplings in and gently stir with a slotted spoon so they don't settle at the bottom and stick to the pot. When the water returns to a boil, add one cup of water to the pot. Once it boils again, add another cup of water. Let the pot come to a boil again and add one last cup of water to the pot. So in total, you'll be adding 3 cups of water to the pot, one cup each time the water comes to a boil. Let the water come to a boil one last time and then remove the dumplings (which should now be floating at the top of the pot) and serve immediately.
I'm often doing a few different things in the kitchen as the dumplings are cooking so I like to measure out 3 cups of water and leave it next to my pot. I add one cup at a time whenever the pot comes to a boil, and once that three cups is all out, I know they're done as soon as they come to boil one last time. Otherwise I often forget how many cups I've added to the boiling pot.


NOTES:
-There's a good chance you'll end up with extra wrappers or extra filling. If it's the wrappers, you can pan fry and eat them plain, or freeze them in a ziplock for another time. If you have extra filling, pan fry it and eat it without the wrapper!
-I used to make a very complicated dipping sauce with a lot of ingredients to go with these dumplings. But I've reworked my low sodium soy sauce substitute recipe and now I just add a drizzle of sesame oil, vinegar (I like balsamic, my husband prefers red wine) and maybe some hot peppers and use that as our dip.
Using a Philips pasta maker:
-If you happen to have a Philips fresh pasta maker with the ravioli attachment, you can make the wrappers using your machine. It's MUCH faster, but the wrappers are a bit thinner and dryer. Flavor-wise, I prefer hand-rolled. But the wrappers from the machine will save you so much time and they're still really good so do whatever works best for you. I used 250 grams of all purpose or bread flour plus 100 grams of water per batch, then used a 3 1/2 inch biscuit cutter to cut out circles. The sheets of pasta don't come out of the machine completely flat, so I do use a small rolling pin to flatten them out as needed. These wrappers are dryer than the handmade ones, so make sure to keep them covered until you're ready to use them.


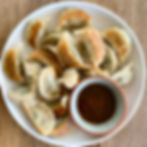
More dumpling pictures, just for fun.


